
Quick Start: Zero to First Message in 30 Minutes
Zero to first message in 10 minutes. No theory, just steps.
Before You Start (30 seconds)
You Need:
A LinkedIn account (active, not dormant)
A Sales Navigator subscription. You can get Sales Navigator Core or Advanced, but we usually recommend Sales Navigator Advanced. Advanced lets you send up to 800 Open InMails per month, compared to the 100 Open InMails per month for Core plan.
Your Valley login credentials. Our team would have sent an email with login credentials. If you didn't receive it, check spam or reach out to support at [email protected]
Browser Setup (only relevant if you are connecting someone else's LinkedIn account to your seat or managing multiple LinkedIn accounts):
Open Google Chrome.
Either use your existing Chrome profile or create a dedicated Chrome profile for Valley.
CRITICAL: Don't skip this browser step if you are connecting to someone else's LinkedIn account. A dedicated Chrome profile prevents LinkedIn login conflicts and keeps your personal browsing separate.
Step 1: Connect LinkedIn (2 minutes)
Make sure you're logged into LinkedIn
Log in to Valley at app.joinvalley.co
Go to Dashboard → Connect LinkedIn Connection
Click "Connect LinkedIn"
You'll be redirected to download the Valley extension. Follow the prompts to download from the Chrome Store and then come back to Valley
Click the puzzle icon in your browser window and open the Valley Extension
Click connect LinkedIn
Wait for the green "Connected" status to appear in Valley. This takes 30 seconds.
If you get disconnected later, reconnect from the same Dashboard page.
Pro Tip: Use the same LinkedIn account for Valley that you use for your normal prospecting. Don't create a second account.
Step 2: Create Your Product in Studio (5 minutes)
Studio is where Valley learns what you sell, who you sell to, and how you write. There are two main sections to set up: Product and Writing Style. Start with Product.
Navigate to Studio
Click "Studio" in the left navigation
Click "Products"
Click "Create Product"
Valley will automatically fill the initial details for you so you can review them. All you have to do is review and make edits.
Here's what is included in the product:
Product Name: Internal reference name. Example: "Enterprise Sales Automation" or "Recruiting Services - Tech". This is just for you to identify it.
Booking Link: This is the link that you will send to the prospect to book a call with you.
Brief Description: What does your company do? Write 2-4 sentences. Be specific about what you sell, who it's for, and what makes it different.
Competitors: List 3-4 main competitors.
ICP (Ideal Customer Profile): Define who you're targeting. Valley uses this to filter warm signals and score every prospect as High, Medium, or Low ICP fit.
Be specific but not so narrow that nobody qualifies. If your ICP is "VP of Sales at B2B SaaS companies with 50-500 employees in the US," that's great. If your ICP is "VP of Sales who went to Stanford and lives in San Francisco," that's too narrow.
Value Props: What specific benefits does the prospect get? List 4-6 outcomes, not features.
Pain Points: What problems does your target buyer deal with? List 4-6 real buyer problems.
Proof Points: Case studies, stats, and social proof.
Why this matters Valley's AI reads your product setup to understand what to emphasize in every message. Specific product descriptions produce better messages. |
Step 3: Set Up Your Writing Style (3 minutes)
Writing Style controls how Valley sounds when it messages prospects on your behalf. You can start from a template and customize.
Create Your Writing Style
Go to Studio > Writing Style
Click "Use Template" to start with Valley's default style
Customize the following:
Tone: Casual vs formal. For most B2B outbound, casual-professional works best.
Length: Keep connection requests short. InMails can be slightly longer.
DOs: Things Valley should do.
DON'Ts: Things Valley must not do.
When everything is fine, click Save.
Tip Don't over-engineer your writing style on day one. Start with the template, launch a campaign, then iterate. |
Step 4: Set Up Warm Lists (3 minutes)
Warm lists are Valley's superpower. These are people already showing buying signals.
Warm list options are available under the Prospects tab.
Enable Profile Viewers
Go to the Prospects tab
Click on Profile Viewers
Enable capture for your connected LinkedIn account
Enable Profile Followers
In the Prospects tab, click on Profile Followers
Enable capture for your connected account
Set Up Post Engagers
In the Prospects tab, click on Post Engagers
Click Start collecting under LinkedIn profile URLs
Insert the profile URL you want
Click the plus icon to add more
Click Start collecting now
Wait five minutes
Come back and verify engagers are loading
Step 5: Create Your First Campaigns (5 minutes)
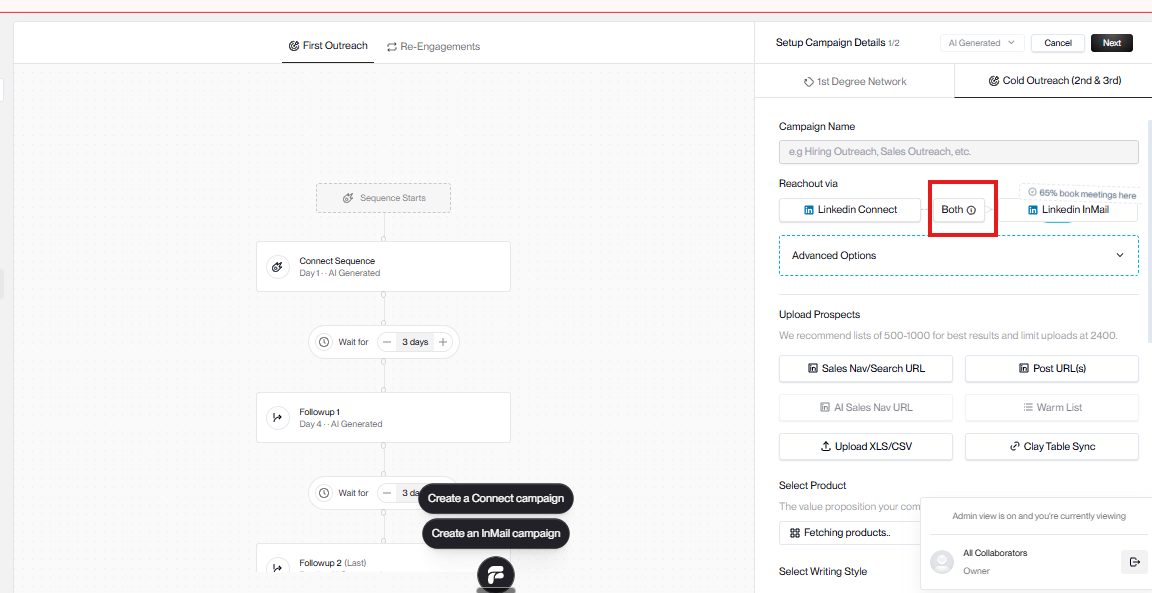
Now that you've set up your warm lists, create campaigns that automatically reach out to your warm signals. Use one campaign and click Both in Reachout via so Valley can handle Messaging and InMail in the same flow.
Launch Warm List Campaigns
Go to a warm list such as Profile Viewers
You'll see prospects scored as High, Medium, or Low ICP fit
Click "Create High ICP Fit Campaign"
Configure the campaign
Campaign Name: Something descriptive
Reachout via: Select Both
Product: Select the product you created in Studio
Writing Style: Select your writing style
Research Agents: Select which agents to use
Logistics: Set your daily send limits
Click "Create"
After the prospects are fetched, click "Launch campaign"
Valley routes closed profiles to Messaging and open profiles to InMail automatically, so you do not need two separate campaigns for the same list.
Use the default routing unless you specifically want an InMail-only or Messaging-only campaign.
Step 6: Train the AI and Launch (5 minutes)
After creating a campaign, it enters Training Mode & Launching Campaigns. This is where you review what Valley generates and give feedback before anything goes out.
What You'll See in Training Mode
Research Summary
Personalization Findings
Generated Messages
Justification toggle
How to Give Good Feedback
In the Training Mode chat interface, give specific feedback.
Launch the Campaign
CRITICAL: You must click Launch when you're done training. If you don't, the campaign sits in Training Mode forever.
Enable Autopilot
After launching, enable Autopilot in campaign settings if you want Valley to send automatically.
Step 7: Launch Cold List Campaigns (3 minutes)
For broader coverage beyond warm signals, upload a Sales Navigator list or CSV.
Upload Your List
Click "Create Campaign" in the top left
Choose your source
SalesNav URL
CSV Upload
Configure the campaign the same way as warm campaigns
Set Reachout via to Both
Create the campaign
Valley automatically detects which profiles are open vs closed and routes them correctly inside the same campaign.
Delete Low ICP Fits
Click into the campaign to see the prospect list
Click the three vertical dots in the top right
Select "Delete Low ICP Fits"
This removes prospects that scored Low on ICP fit so your LinkedIn credits go to the right people.
Advanced Options
Leave Advanced Options alone unless you specifically want InMail-only or Messaging-only routing.
Step 8: Your Daily Routine (5 minutes/day)
Once everything is set up, Valley runs on autopilot.
Check Your Inbox
Go to the unified inbox in Valley
Valley auto-categorizes replies
For interested replies, Valley drafts a response in your writing style
Review the draft, edit if needed, and approve
Check Campaign Performance
Go to Dashboard > Campaigns
Review your key metrics
Accept Rate: 25-40% is good for warm, 15-30% for cold
Reply Rate: 15-30% for warm, 5-15% for cold
Interested Rate: 2% average across all customers
What to Expect After Launch
First 24-48 Hours
Valley starts sending messages from your LinkedIn account. You'll see outgoing connection requests and InMails in your LinkedIn activity.
Days 2-5
First replies start arriving. Check your Valley inbox daily.
Week 1
You'll have a clear picture of how your messaging is performing.
Week 2+
By now you should have a steady daily flow of new conversations.
Adding more influencers to Post Engagers for higher volume
Uploading additional SalesNav lists
Setting up a Slack webhook to get instant notifications for interested replies
You now have your first Valley campaign running. Go check your LinkedIn inbox for the first replies.